Devil's World Heroes Sessions 2 & 3: Too Many People In The Neighbourhood
Last session, The Big Boys explored the Blue Ruins, leaving with a minor amount of treasure and one dead party member (or rather, leaving without him). A resounding success, all things considered. We were also witnesses to the murder of another adventuring party at the hands of an archer clad in black and his tall dwarf companion. Alas, on the way back, Dwelf Lundgren (ags) was knocked out by a strange lady while scouting through the Dark Woods.
Session Two: Rogues Gallery
The party finds Dwelf unconscious, naked, a "W" carved on his body, and free of all possessions except a note from a group that calls itself "The Liberators". The note informs us of the following: a) we should be more careful when passing through the woods, and b) our cowardice has been duly noted. The grave disrespect toward our comrade has also been duly noted. We update the party's shit list with a new entry, promising cruel vengeance upon: "whoever those fuckers are."
Oh, and Marko joins the party: Fighter; 13 Str; 10 Int; 12 Wis; 9 Dex; 16 Con; 10 Cha, played by Jenx.
Encounter with Ser Barral
Approaching the bridge to Zaxon, The Big Boys join a crowd of onlookers spectating an aerial duel between two knights mounted on pteradons [sic]. One heavyset and the other thin, we watch, mouths agape, as the riders aim their lances at each other. With a thundering crash of steel against steel, the thin one drops into the river like a stone. The crowd cheers: "Old Ser Barral's still got it! The youngster had no chance! It takes more than Wynsel's word to be a real knight!"
Ser Barral dismounts with great difficulty—huffing, puffing, and assisted by squires. Chatting amongst ourselves, we make some poorly worded comments about his person, noting his purple, potato-like head with bulging veins and eyes, and his barrel-shaped body. If the former could perhaps be explained by his recent descent from the upper layers of the atmosphere, the latter seems to be a relatively permanent feature of his physiology. "Pfft, adventurers", he scoffs, having overheard us. We should have maybe commented on his armour instead of its unfortunate contents, for the armour was quite beautiful indeed—fine plate with gold trimmings, a motif of trees. Or complimented his steel lance, artfully carved to resemble a tree as well. That would have left a better impression, for sure.
The spectacular aerial display inspires Kimimi (Havoc) to one day become a knight, take to the skies clad in shining armour, and rein a noble pteradon [sic].
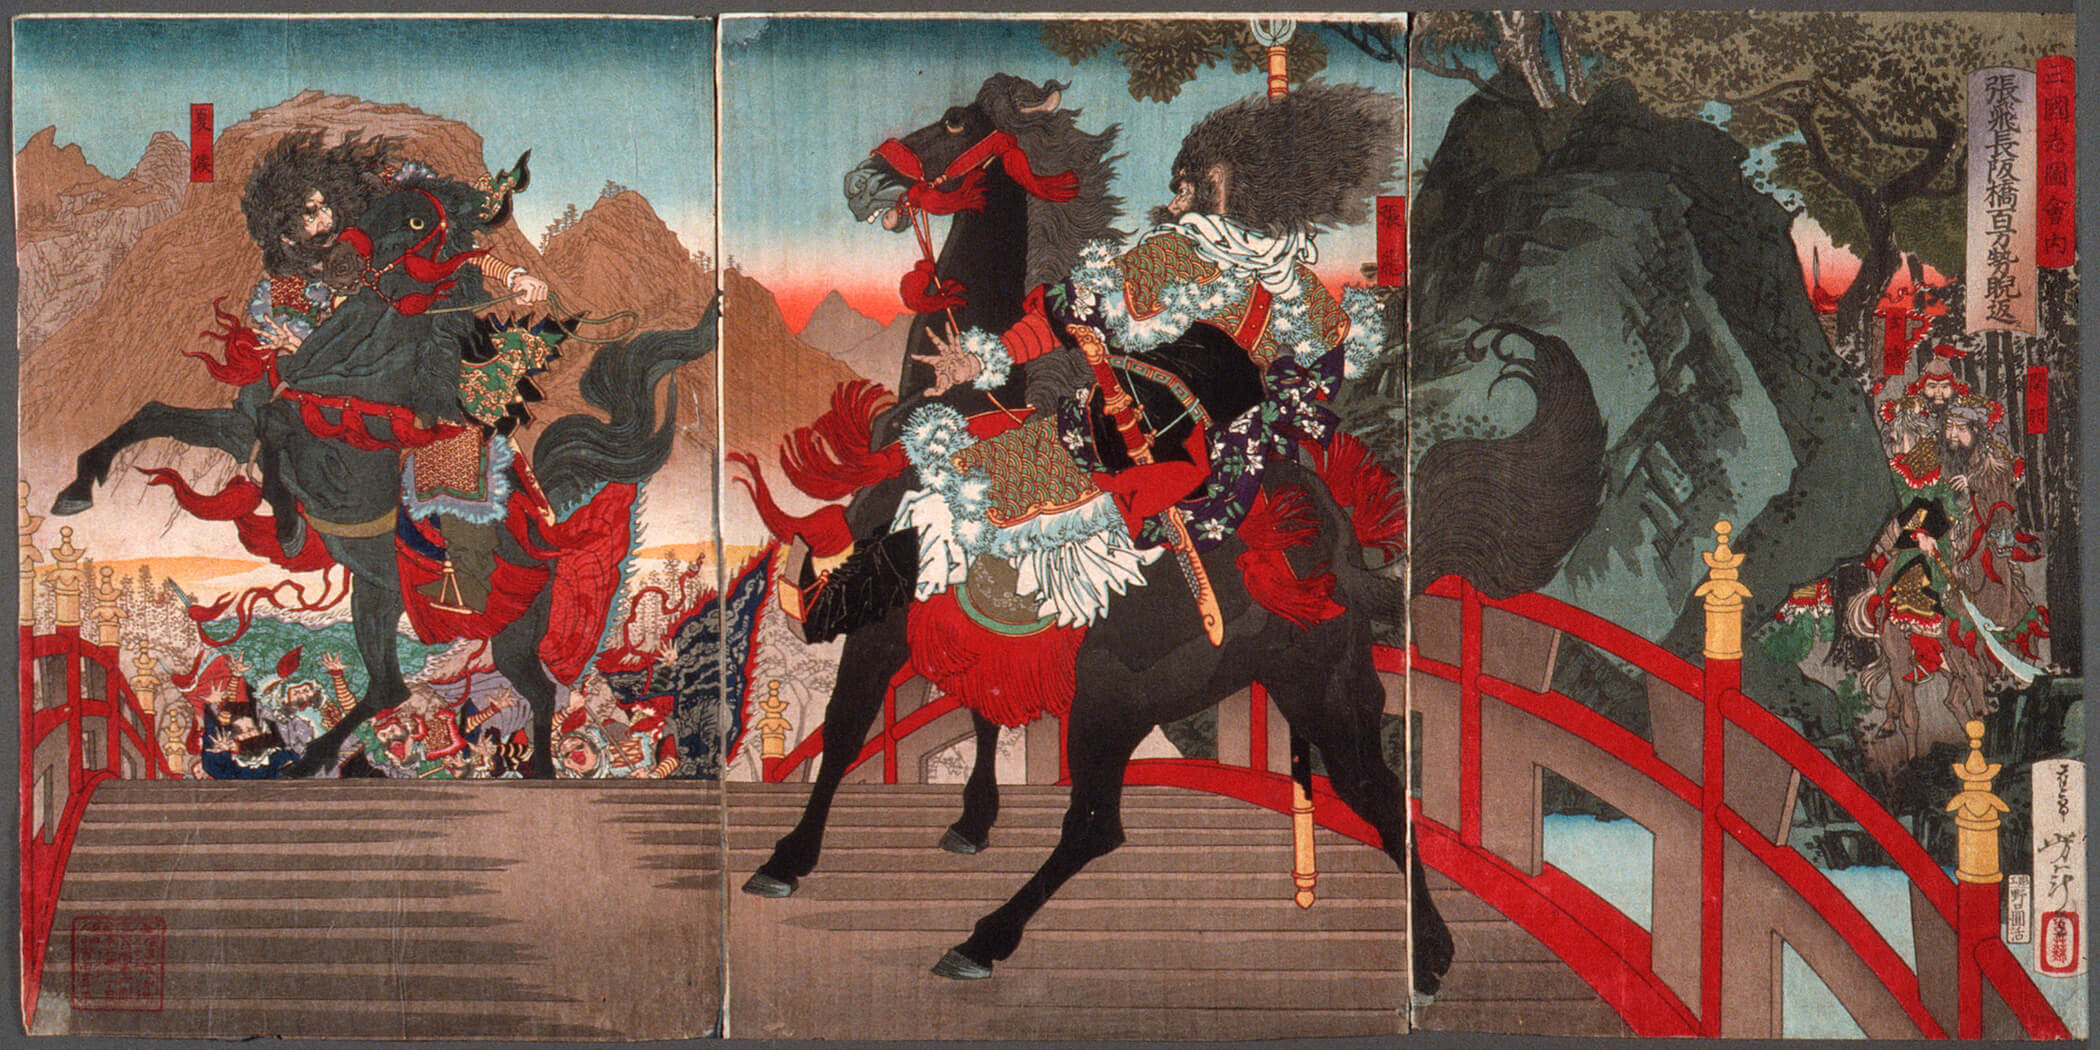
"Zhang Fei on the Long Sloped Bridge Turning Away One Million Wei Troops with a Powerful Stare" by Tsukioka Yoshitoshi (Source)
Exploring Zaxon
Upon returning to the city, the following list of amenities is provided for our leisurely exploration:
- Shops: weapons, armour, equipment
- The Royal Moose Inn
- Temple of Odo
- McCullen the Boneworker
- Skull Fort (Wynsel)
The Temple of Odo
Assumed Background Knowledge is narrated, and our characters "remember" that Saint Odo fought Lucifer in the Final War 1,000 years ago. The temple specialises in healing, turning the undead, nature magic, and the like.
Inside, Samson the Swole Acolyte offers us tea and bread. In the background, an old priest is busy doing priest things. Samson is here to recover the bones of St. Kristoff, which he believes are lost somewhere in the Wylderwoods. According to legend, the Skull Fortress of Zaxon once sat on the shoulders of a Titan that St. Kristoff supposedly piloted into battle against the Vampire Giants. If we follow the scattered remains of the Titan around the Wylderwoods, we might uncover the bones of St. Kristoff. Awesome.
We ask Samson about demon-associated statuettes, carefully phrasing the question so as not to clue him in to the fact that we are in possession of one (The Many Boobed Statue, 100sp). It turns out that what we have is a "fetish object made in the image of a demon". Satanists use them to invoke some of the powers of the demon depicted. Samson wants us to bring any we find to the temple so that they may be cleansed of their evil properties. He didn't mention a reward, so I think we'll just sell it.
Dwelf is interested in becoming an acolyte, but the process is a bit involved, so we are postponing the matter for some other time. [Context: NBateman's homebrew omits the Cleric]
When asked about The Liberators, the old priest becomes wildly animated: "The Liberators?! They liberate nothing! That vile-tongued apostate, Francisco, ran off with the Liberators. He's a Satanist, through and through!"
Catching up with Prince Wynsel
Kimimi, the Man-Eating She-Monster, much inclined towards nobility and power, visits Prince Wynsel at his cottage in the Skull Fortress. She questions him in a tone somewhere between flirtatious and creepy, which makes Wynsel rather uncomfortable. Clutching a silver locket around his neck, he volunteers the following information:
- Wynsel has been in power for 5 of his 24 years.
- He can't ride a pteradon [sic] and is insecure about it.
- The knights and vassals of the dead king (especially Ser Barral) hate him for the aggressive expansion of his rule, and the proliferation of uncouth adventuring riffraff in the area.
- The commoners, on the other hand, like him: all the graverobbing activity's been bringing a lot of wealth to Zaxon.
- By the laws of the land, to be crowned King, he must first take a lady's hand in marriage—something he's been having some trouble with.
- Sending adventurers to explore the local ruins has something to do with his wife-quest, but he doesn't want to talk about that any more.
Rival Adventurers at The Royal Moose
By Prince Wynsel's decree, all adventurers are given a free stay at The Royal Moose Inn. Melinda the barmaiden greets us, and right away, we question her about the Liberators.
— "Oh, I've heard of them, love. They don't come around here too often, and they don't stay in Zaxxon either. Something about not wanting to pay taxes. Wren is their leader; they say he's positively dashing. I wonder if he likes blondes? Tee-hee." So that's what the "W" stands for, huh? Melinda seems a bit suspicious, like she knows more than she's letting on. We'll have to keep an eye on her.
But for now, let's pan the camera across the tavern and take a look at some of the patrons.
The Wolfpack! AWOOO!!
A group of shirtless young men wearing wolf-skin cloaks and wolf-fang necklaces has booked one of the larger tables. They're slamming mugs and obnoxiously yelling, "The Wolfpack! AWOOO!!" after every chug. Their leader, Chadley, says that one of their pack-mates got laced up by machine gun fire in the northwestern part of the Blue Stone Ruins. These guys seem cool; I wonder if we can join them?
— "Join us? To join us, you gotta be jacked, and kill a wolf with your bare hands while naked, and be five beers deep, and we're gonna watch and, and... Wait, you're not from Zaxxon. Only the proud sons of Zaxon are allowed in The Wolfpack! AWOOO!!" — as Chadley says this, the others join in: "AWOOO!!"
Uncle Daddy's Crew
A middle-aged looking man in a black suit, wearing glasses and gold accessories, with his hair slicked back and a sharply pointed yaoi chin, sips on a martini. The barmaidens are head over heels for Uncle Daddy. Next to him is Sebastian, a tough-looking guy so generic that "tough-looking guy" was literally the entirety of his description. And Spazzer. Spazzer's got a collar around his neck and a mean twitch; he's shifting around restlessly, eyes darting all over the place, and, yes, occasionally spazzing.
Uncle Daddy is something of a scientist. He's come to the Wylderwoods in search of Crystalean technology. Crystaleans were an ancient, technologically advanced civilisation that came from space. More importantly, Uncle Daddy is one of those "discerning buyers" who often show up in treasure descriptions—he'll pay more than market value for ancient technology.
Stillborn Flesheater
A hulking figure in full plate, so tall that his feet reach the ground while sitting on a bar stool (wow). Non-stop slamming tankards, which look comically small in his big, red, clawed gauntlets. He doesn't seem to be getting drunk at all. The sickly pale skin and the stitches running across every limb and joint provide a clue as to why.
In hushed tones and whispers, we piece together his story: unborn son to King Deborkus, he was buried with his mother in the woods, festering in her womb until a horror movie lightning bolt struck the grave, animating his rotten flesh. Raised by witches, he knows the art of spellcasting, fights as if he were six men at once, and is, by all accounts, a sick fuck.
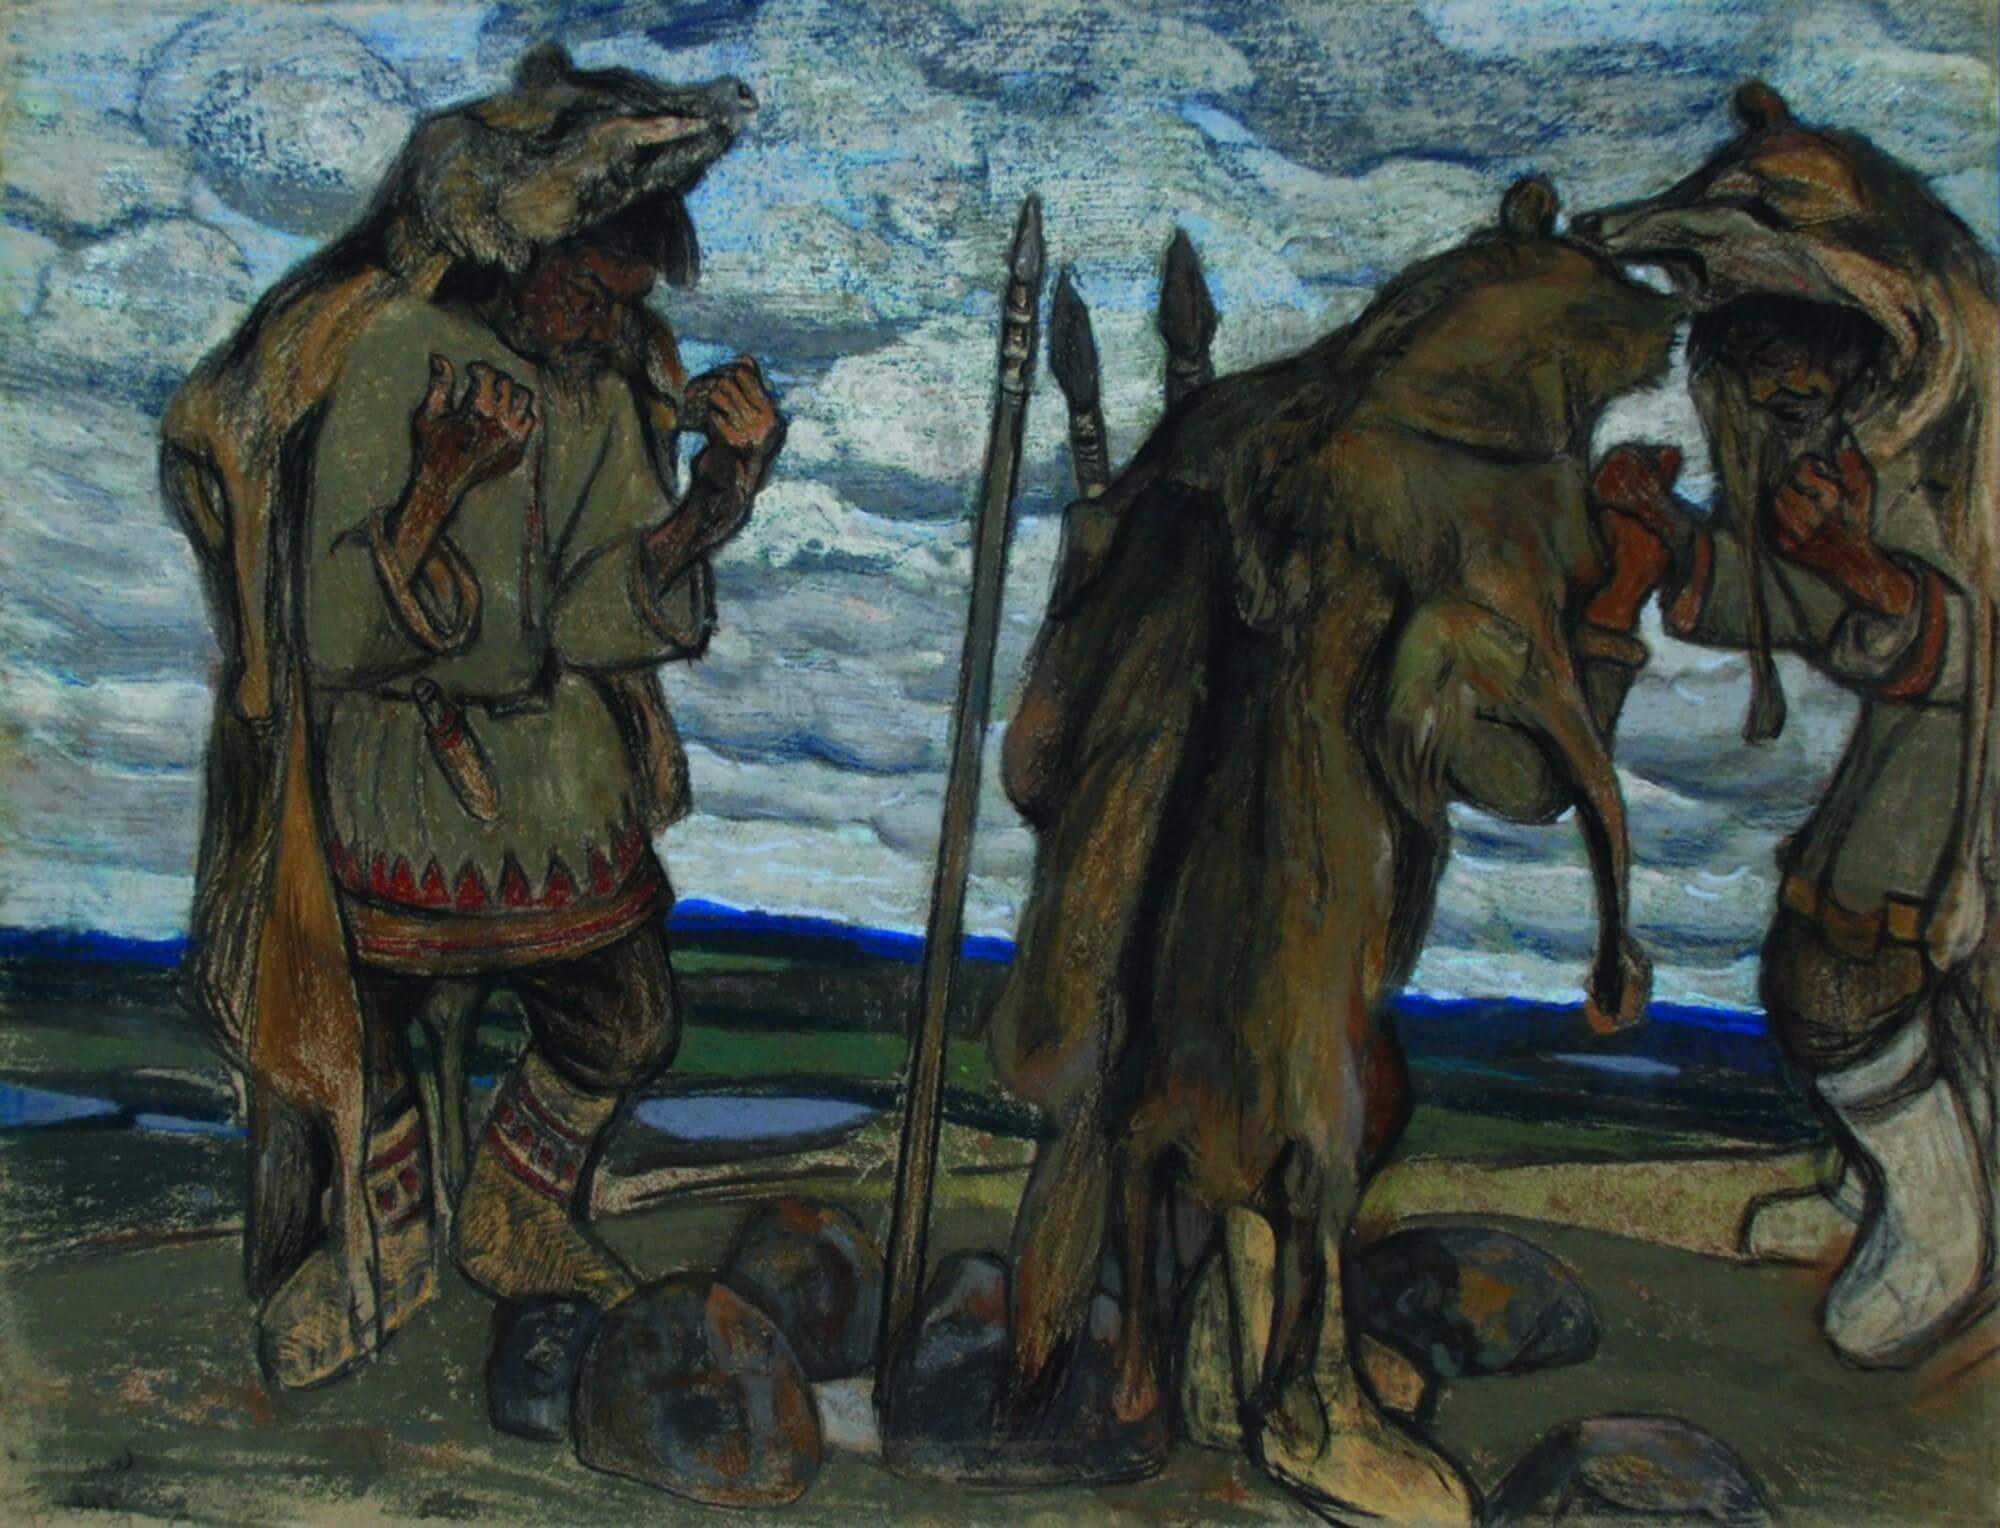
"Sorcerers" by Nicholas Roerich (Source)
"One hour of town fucking around is enough"
— NBateman
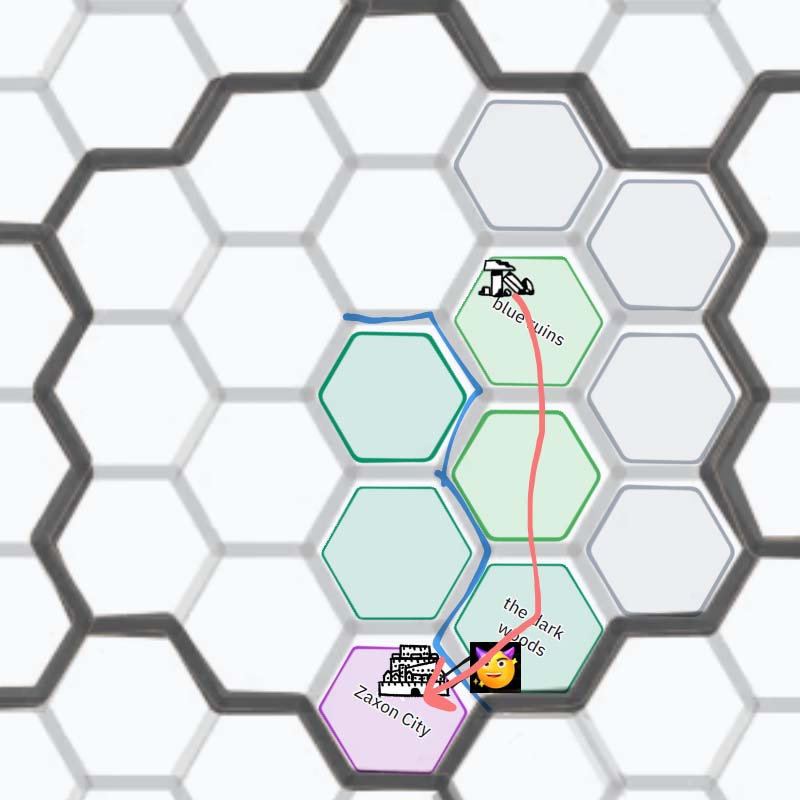
Guess we won't be visiting the Boneworker. Equipment is bought and spells are prepared: Kimimi prepares Light; Krangclutter (Kirkæͦ) prepares Sleep. The weather roll results in "storm", so we set out the next day. This had no "mechanical" consequences; no resources were depleted, and no other "pieces" moved in the interim. So how is this different from simply re-rolling that die? We agreed that it "happened", and I wrote it down; that's how, lol. The journey back to the Blue Ruins was uneventful, and so we pull up our dungeon map:
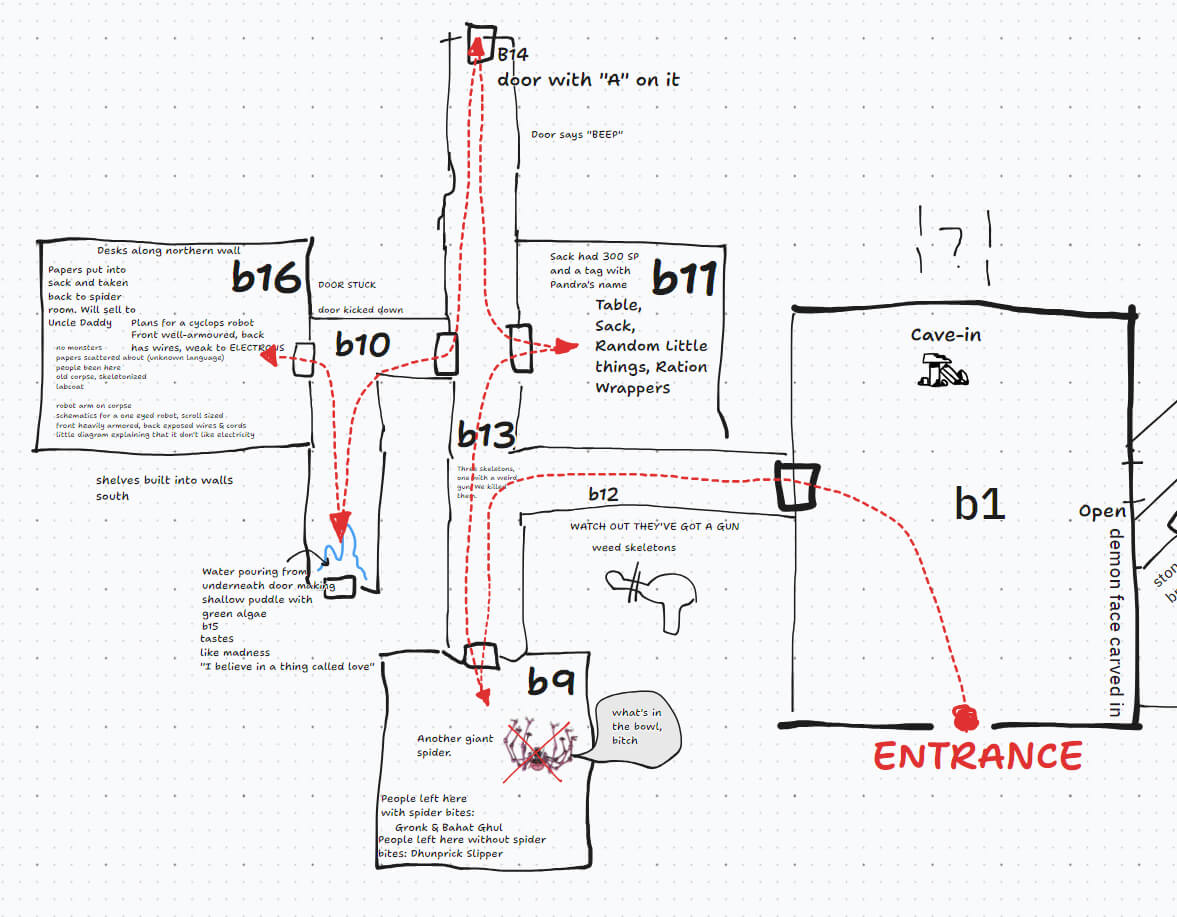
In an astounding demonstration of creativity and free spirit, The Big Boys go through the door on the left this time.
B9
The very first room of the delve holds minor disaster for the party—Gronk Boblin (cellar gelatin) and Bahat Ghul (Zygo) fail their saves against the poisonous bite of a Giant Spider (thankfully soon defeated). "Minor", because we are given a softball in the form of anaphylactic shock, convulsions, vomiting, a sense of impending doom, and a permanent -1d3 to Constitution. Clerics don't exist, and nobody knows how to perform a tracheotomy. A proposal to suck the venom out of the wounds is flatly rejected—by decree of the dice, the spider's fangs happened to land on the undignified parts of the body. All that can be done is to leave them here until they Get Well Soon. Dhunprick Slipper (Mr. Mann) kindly volunteers to remain as well, acting as guard and trip sitter to the poor sods.
B11
An open sack on the floor, food leftovers and half eaten rations. In the sack, 300sp and assorted adventuring equipment. A name tag is sown onto the sack, indicating that this is the property of Pandra. Ah, well, she won't be needing the 300sp any more. Hey, it's not stealing if they're dead and in a dungeon. We're just being morally consistent.
B13
Overgrown skeletons, 3 of them, shuffle in from the south. One is holding a raygun. The skeletons win the initiative and the awesome power of the raygun is demonstrated (fortunately, not on a live target). The heat of freshly molten blue stone blowing on their napes, The Big Boys rush at the skellingtons. Dunnar Dunnarsonson (mtb) tackles the raygun skeleton, crushing it to pieces. Having heard the sounds of battle, Dhunprick runs back up from the south, and rest of the skeletons are soon dispatched in melee. Unfortunately, Marko is down to 1 HP. The raygun is looted. A glowing indicator suggests there are two charges left in the battery.
B14
The northern end terminates with a sliding door with a panel on the wall next to it. Exactly like the one we found last delve in the eastern part of the ruins, but with the letter "A" this time. We leave it for until after we check out the unexplored branch of the corridor, to the east.
B10
Door on the southern end of the corridor; a shallow puddle of water seeping through the crack; nearby surfaces overgrown with algae. Dhunprick tastes the water. "It tastes like madness". The giant worm fresh on our minds, we turn away from this door as well.
B16
Shelves on the southern wall; desks along northern wall. Papers scattered on the floor, written all over in a language unknown to us. An old, skeletonized corpse in a labcoat. The left arm, elbow down, is augmented with a sophisticated robotic hand. It's fully articulated, as well as having the ability to extend and retract back. Floppy disc in pocket, worth 1000sp to the "discerning buyer". In one of the desk drawers, there is a schematic for a one-eyed robot. We take the robot arm, floppy disc, schematics, and gather a stack's worth of papers off the ground.
Honey, what's wrong? You've barely touched your dungeon
Gronk and Bahat Ghul wake up, still woozy and suffering -4 to attack rolls. There's still 45 minutes left until the end of the session (out of 3 hours allotted), and we've only explored three rooms. But with three fighters in bad shape, and a guaranteed payout already in the bag, going back to town seems to be the rational decision here.
Night camp on the way back
Four Giant Dragonflies circling above us. Dhunprick lights a torch and tries to scare them away, but it doesn't work. Marko stands guard before the 2 poisoned fighters, ready to sacrifice his last remaining HP. We're kind of scared a bit. Kimimi deploys the raygun, and one of the dragonflies is instantly vaporised. Might've been a bit of an overkill. The rest are driven off with unelegant weapons for a less civilised age.
Ser Barral's bridge again
Armed goons, lazing around near the bridge, jump up at the sight of us; one of them gestures for us to stop. They demand that we contribute 10sp to Ser Barral's Bridge Renovation Fund. Marko objects, relaying Wynsel's promise of protection.
— "Wynsel? This bridge was built by Ser Barral himself. Wynsel's got no authority over it. Besides, you've been stomping over this bridge, carrying heavy sacks of dungeon treasure over its poor, creaky back, and you won't even pitch in for renovations? Where's your sense of social responsibility?"—The goons are unfazed.
Marko digs in his heels:
— "If Ser Barral wants us to pay, he can come down here and tell us himself."
— "You sure you want to do this, man? Ser Barral would be pissed. He might even kick your ass, just for the insolence."
— "Okay, enough of this."—Marko takes out the raygun—"We found this in the Blue Ruins. One shot was enough to turn a Giant Dragonfly into a pile of ash. Let us pass."
This doesn't have the intended effect. The goons, feeling threatened, order us to lay down our weapons; they're going to arrest and take us to jail for menacing with a deadly weapon and general insubordination. Before the situation gets out of hand, Krangcutler casts Sleep, and we hastily walk away from the scene. All this over 10sp.
Oh shit, it's Wren of The Liberators at the Royal Moose Inn
Ok, I don't wanna waste time bigging up this a-hole. Basically, the archer clad in black we saw murdering Pandra & pals is Wren. He's caught wind that we've been asking around about him and The Liberators, and came here to talk shit. There seems to be a bit of a disconnect in how he and we interpret the events that transpired. From our point of view, Wren and his gang are total scumbags who murdered another group of adventurers and robbed and disfigured our friend Dwelf. For him, the whole thing is a bit of a joke; he's genuinely bemused that we'd take the treatment of one ours so badly. Not only that, he suggests that we just squash the beef and work together in the future. Nah, fuck that. This beef forever; forgive never. Shit's for life.
This is a non-PvP zone, so we let Wren leave, even though we could totally take him—he's only, like, 3 hit dice or something, judging by the firmness of his handshake (the standard method of assessing someone's HD in NBateman's games). However, we have our thieves follow behind him: Dunnarson on the ground and Dhunprick on the rooftop. Both fail their stealth rolls and can't get too close without being spotted. Dang! They watch from a safe distance as Wren slips into the alleyways, and, after some time, two more figures follow him out—an old man and a lady. Dunnarson follows them north to the edge of the city, where they disappear into the forest. Dhunprick investigates the alley; stuffed in a barrel tucked into a dark corner are multiple sets of clothes and a blonde wig. Hm.
Treasure, Kills, Downtime
Back at the Royal Moose, loot is counted & exchanged for currency (which, in turn, can be exchanged for goods and services):
| Treasure | Value (sp) |
| Pandra's Purse | 300 |
| Floppy disk | 1250 |
| Schematics for one-eyed robot | 200 |
| Total after tax | 1750 |
The raygun, we keep for ourselves. Uncle daddy looks over the one-eyed robot schematics, and points out a weak spot—the back of the robot is exposed & under-armoured. The robot arm is actually worth 5000sp, but when Uncle Daddy mentions that he could also have it installed for a fee, Bahat Ghul pulls out a dagger and starts hacking at his left arm. He's only halfway through when the party assures him that he can have it—a masterful gambit.
The stack of papers includes some writings on the history of the Crystaleans. Uncle Daddy offers to translate them and share the findings with us, but he won't pay for it—not technology. Sure, let this be an act of goodwill. May our sugardom to Uncle Daddy be long, smooth, and lucrative.
| Monster | XP |
| Giant Spider x1 | 500 |
| Overgrown skeleton with Raygun x1 | 200 |
| Overgrown skeleton x2 | 200 |
| Giant Dragonfly x4 | 800 |
| Total | 1700 |
Total of 3450 XP split 8 ways—431 XP per character.
Downtime actions:
In NBateman's games, downtime actions are resolved in direct messages. Therefore, I am not privy to other players' downtime actions unless they mention their intentions beforehand, share the outcome before the next session, or the outcomes come up later. That said, here is what I've pieced together for session one:
- Krangclutter and Marko go carousing, run into The Wolfpack! AWOO!! and Ser Barral's men.
- Dwelf Lundgren bonds with Samson on the basis being former sell-swords. Samson agrees to help Dwelf become an acolyte. To that end, Dwelf must read & memorise The Book of Eldren. This will turn him Lawful.
- Dhunprick rolls around in mud near Ser Barral's bridge. Later, he does research on the machine grease that might have remained from St. Krisoff's Titan, and the possible magical properties thereof.
- As for Bahat Ghul, the surgery to install the robot arm and the recovery from the spider bite will take up the time allotted for downtime.
Next session:
A surprise invitation from Ser Barral!
Session Three: Murder! At The Dungeon
The Big Boys receive a letter of invitation from Ser Barral. I hear that Krangclutter has squashed the beef with Ser Barral's men through drunken revelry, and they'd put in a good word for us, thus prompting the invitation.
We arrive at Ser Barral's shōen (manor), and his okugata-sama (wife) leads us to the karesansui (rock garden), where he sits beside his noble pteradon [sic], eyes closed in meditative practice (meisō). Barral's got a bit of a samurai thing going on. We wait patiently for him to finish the meditation. Finally, Ser Barral opens his eyes—a freaky sight, like a sweet potato spud sprouting eyeballs—and scans us over, briefly pausing in surprise at the sight of Kimimi. Guess they've met during a downtime action?
Danger in The Depths
As the only adventuring group not already affiliated with an adversary, while also being somewhat susceptible to reason, we are entrusted with the following information by Ser Barral:
- The Blue Ruin was a once holy site, now corrupted by demonic forces.
- It contains a great evil which, if released, threatens mortal danger to the whole of Wylderwoods.
- This information comes from The Temple of The Wind, who raise & train the noble pteradons [sic], and defend the lands from chaos.
- Delving the dungeon risks releasing this evil, and Wynsel has impetuously ignored the temple's demands to stop having adventurers plunder the ruins for his profit.
- Even if the worst does not come to pass, Wynsel's actions risk permanently souring the relations between Zaxon and the Wind Temple.
- No one has gotten past level 1 of the dungeon yet, but if level 2 is breached, the risk grows exponentially.
- The Temple of The Wind is somewhere in the north-west of The Wylderwoods.
- Beyond the Wind Temple are The Deadlands. It's where the aforementioned forces of chaos reside.
Kimimi, heart on her sleeve and knighthood on her mind, pledges on behalf of The Big Boys to find a way to purify the dungeon of its evil and "deal" with the other adventurers. Ser Barral finds wanton murder distasteful, but dungeons are dangerous places, and, well, accidents happen. We might be able to talk Uncle Daddy out of messing with the ruins, since he seems reasonable. The others? Less so. Stillborn Flesheater scariest of all. Oh, and we don't have to pay the bridge toll anymore.

New Magic Just Dropped
Since last session, there's been an update to the homebrew rules concerning magic. I believe it's a mix of Wonder & Wickedness with some tweaks and original spells, but slightly rephrased to encourage more creative interpretations. I'll rephrase them even more tersely here, for the purposes of following along with the play reports.
Magic Casting: Each level grants a spell slot. For every +2 to the Wisdom modifier, an additional spell slot is granted (attribute scores can exceed 18).
Maleficence: Any spell slot may be expended as a 2d6 attack with properties determined by the sorcerer. Affects everyone in melee, or one target at range. Save vs. Spells for half damage.
Spell Defense: Any prepared spell may be expended to protect a number of people equal to half the sorcerer's level.
Kimimi replaces her spells with the following:
- Ravage Panoply: Destroy a number of suits of armour or weapons equal to the sorcerer's level.
- Gift of Sunlight: A sigil, carved on a wooden object, emits sunlight in a double torch radius.
- Vitalize: Stone is animated as living flesh, complete with viscera, organs, and beating hearts. Petrified creatures are restored permanently; flesh wrought from regular stone collapses into biowaste when the spell ends.
Krang:
- Dust of the Sandman: It's Sleep.
- Comprehension: Lets the sorcerer understand the meaning of a communicated message. Not only languages and ciphers, but also animal calls and signs from spirits may reveal something.
- Ethereal Boundary: Create an anti-magic barrier around the sorcerer that can shield a number of people equal to the sorcerer's level.
Kimimi prepares Vitalize & Ravage Panopoly (owing to her +2 Wis Mod). Krang prepares Sleep. The Scroll of Sleep was consumed for learning, and then the magic update replaced the existing spells, so it was lost. Whoops! Now we only have the Scroll of Darkness. Gronk, as the de facto party leader, inherits the Greatsword of Rhus +0.
Tomb raiding, but with an excuse this time
Rations are bought and consumed faster than you can say "weather good; no encounters", and we're back in the dungeon:
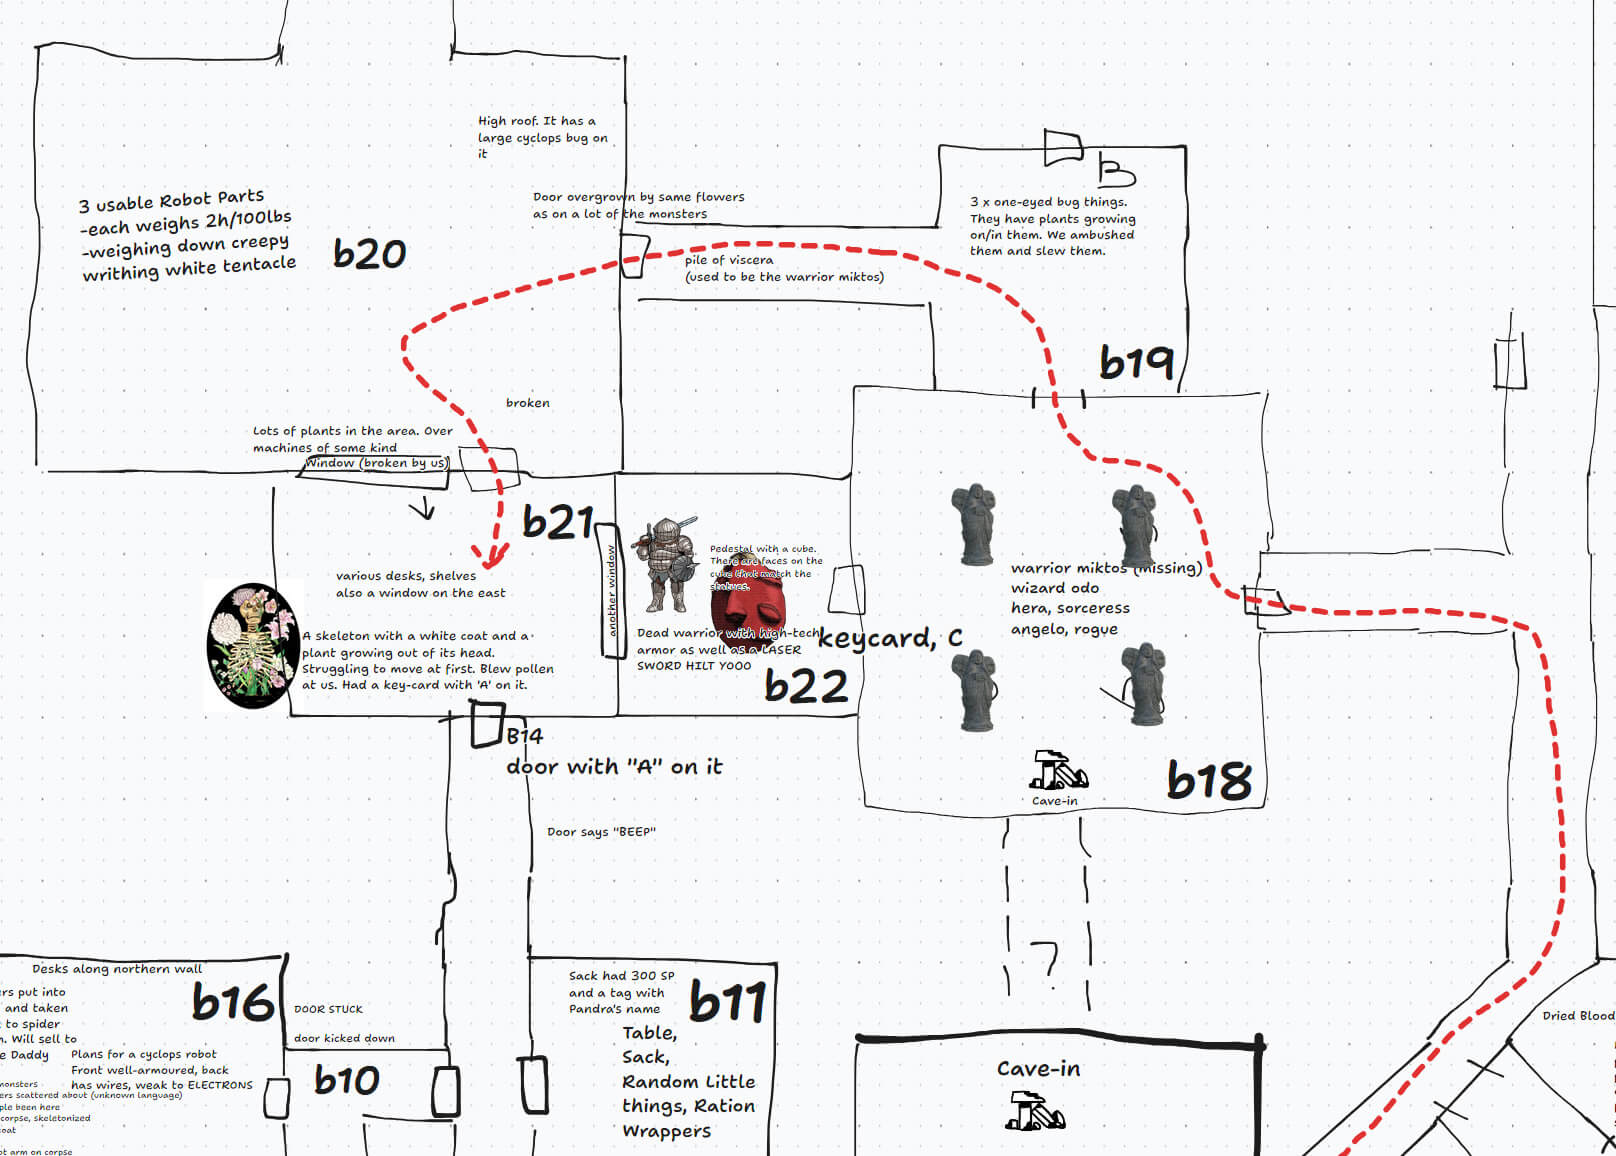
B18:
Faded statues, four of them, depicting the ancient sages who defeated Lucifer in the final war. Miktos the Warrior, Odo the Wizard, Hera the Sorceress, Angelo the Rogue. Door to the west is labelled "C", locked.
B19:
Door to the north is labelled "B", also locked. Thick shelled, four legged bug-like creatures with a single eye in the middle. We beat them up no problem. Corridor to the west ends in a door, overgrown with pink-flowered plants, similar to the ones we've seen on the skeletons.
B20:
Large room completely overgrown with plants. In the middle, ruined factory equipment, remnants of a production line of some kind. To the west, a pile of robot parts, similar to the ones depicted in the schematics we found last session. Eight one-eyed bugs in the room, munching on plants. They don't attack us. On the southern wall, a door and a glass window into another room. To the north, a long, wide corridor.
Inspecting the pile of robot parts, Gronk notices a whitish, tentacle-like plant covered in whiskers trapped underneath it, feeling around with its stringy vines, struggling to free itself. Gronk pokes it with his torch; it screeches and recoils from the heat. Firebombing it would damage the robot parts, which might be valuable. Probably shouldn't mess with it, not knowing what it is and how dangerous it could be.
The door to the south looks pretty tough, so Gronk decides to enter through the window, shattering the glass with the Greatsword of Rhus +0. This turns out to be a bad move because it triggers one of NBateman's trademarked boss fights. We hear something move and shift in the ceiling, and the one-eyed bug things start squealing, their disposition markedly more hostile than before. Heads thrown back, we behold a Gigantic One-Eyed Bug preparing to drop down and kick our asses in approximately one round.
Gronk and Dwelf jump through the window, hoping to take advantage of the chokepoint; the rest of us retreat back to the corridor we came from. The plan is to hold the corridor while Kimimi runs back to the room with the statues, Vitalizes the statue of Miktos, and brings him back to tank the big bug. Dhunprick fires the last raygun charge, and the energy blast melts the giant bug's armoured shell—a hefty penalty to its AC.
Including a complete round-by-round record of the fight would be excessive, although I am tempted—it was quite an exciting and tactically interesting combat sequence. It's a good example of multiple elements combining into something greater than the sum of the parts: one big guy, many smaller guys, plus an interesting space/environment to play around in. Result—really cool set-piece fight. The setup was rather devious, too—a heavy door and an easily breakable glass window next to it? Devilish. Maybe for one of the more combat-heavy sessions in the future, I'll describe the fights in more detail. Some fights function as resource attrition, while others are more like puzzles. The latter type might warrant a more elaborate portrayal.
Anyway, the animated statue of Miktos soaks up quite a bit of damage before turning into meat goop. Krang uses up his Sleep spell on the smaller bugs. Kimimi lands the final blow on the Giant Bug with Maleficence, which she shapes into the form of a Kamehameha. That was pretty hype. Everyone's pretty beat-up, but nobody dies.

The Last Awoo
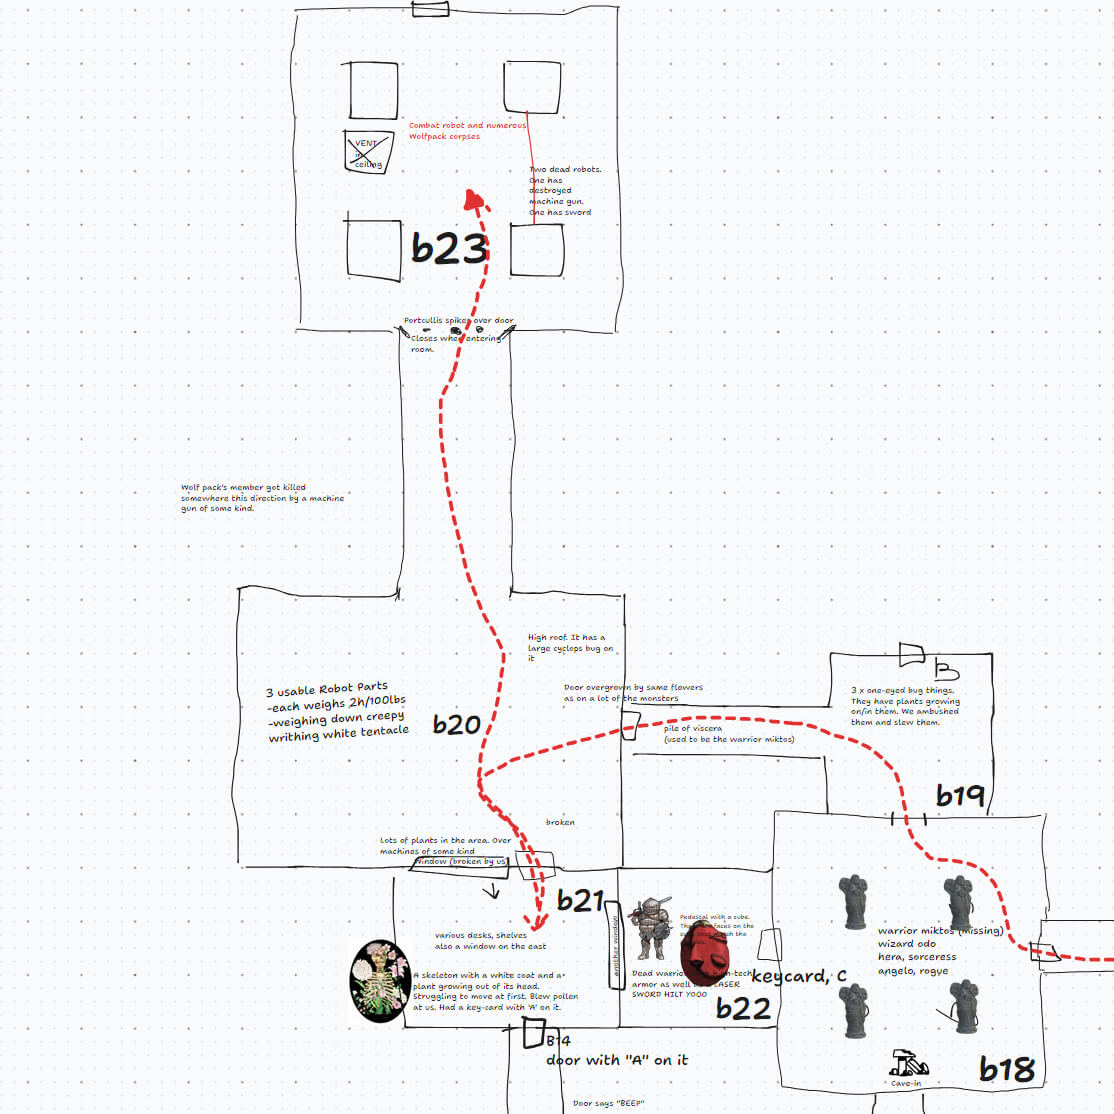
B21:
Desks, shelves. In the corner, a skeleton in a lab coat, partway through being taken over by plants. Dwelf turns it over, and it exhales a cloud of strange pollen. Dwelf makes the save, and the skeleton is put down. In the lab coat, a keycard labeled "A", and another floppy disk (cha-ching!). To the east, a grated window into another room.
B22:
Nothing thicker than an arm can pass through the gaps in the grate. Behind it, we see a suit of power armour, the hilt of an energy sword, and an engraved cube. Bahat Ghul reaches for the energy sword with his extendo-arm. Unfortunately, the arm is quite clumsy at longer distances, and the sword is knocked out of reach. More luck with the cube, which, conveniently, also fits through the grate. On four of the faces of the cube are engraved images of Miktos, Odo, Hera, and Angelo. The other two are dedicated to Lucifer and the Goddess.
Yet again, attrition cuts our delving short. This time, without much to show for it, either. At least, that's what we thought until we got jumpscared by The Wolfpack! AWOO!!! We just about shit our pants—the seven of them would wipe the floor with us in our current state. Thankfully, the combination of a decent reaction roll and Kimimi's feline charms has their leader, Chadley, lower his guard. He tells us they're here to avenge their friend, cut down by machine-gun fire somewhere north of the factory room.
A cunning plan hatches in our unscrupulous minds: we'll offer our assistance against whatever foe they're intending to face, but retreat immediately. Whichever side is victorious, the survivors will be easy to finish off. Chadley & friends must be pretty gullible because our plan works exactly as (loudly) described. The only condition is that Kimimi stays out of it because The Wolfpack! AWOO!!! doesn't fight along side girls. This annoys us greatly. The Big Boys respect women. They hype each other up, turn bright red, and run into the corridor to the north.
Automatic fire; clashing of metal; screams; silence. Only two come back—Chadley and one of the younger wolfpackers. At this point, we're okay with just letting them go; they won't be adventuring again any time soon. Kimimi, apparently, didn't get the memo because she walks up to the wounded Chadley, hugs him feigning affection, and then slits his throat. His friend, the poor boy, turns bright red again from rage and grief, then collapses with a loud *pop*—his head exploded. And that's the end of the Wolfpack... Awoo.
B23:
But enough about tragedy; let's talk loot. Among the scattered corpses of young men in wolf pelts lay the mangled remains of two cyclopean robots: one with a machine gun and one with a giant sword. The machine gun is, unfortunately, wrecked beyond repair, but we do pick up the giant sword and pluck the robo-eyes from the robots.
Ah, hell. Let's take Chadley's cloak and Greataxe +1 as well. Waste not, want not. Now we can return to town with a clear conscience.
At last, an overland encounter
Half-eaten deer carcasses are strewn about, laying in pools of metallic-blue grease. Closer examination reveals that the deer have been partially roboticized: flesh, organs, and limbs are perfectly fused to mechanical parts. The grease expert, Dhunprick Slipper, is called to the scene. He rubs the blue grease all over himself, including his wounds and orifices (standard methodology): "This is the blue grease made of constituent parts!" Insightful analysis as always. We'll take a sample for Uncle Daddy. And by "sample," I mean an entire deer carcass.
The sight of Dhunprick makes Uncle Daddy lose it a little bit. Note to self: do not bring Nanomachine Titan Blood to populated areas. It's a "civilization-ending contagion", or something. Everything that came in contact with the grease will have to be put in the Boiler and decontaminated. Dhunprick is as good as dead, unless he miraculously survives the Boiling process. "It's the false grease!", he shouts, as Uncle Daddy shoves him in.
| Treasure | Value (sp) |
| Flippy Disk | 1000 |
| Giant robot sword | 300 |
| Robot eye | 500 |
| Total | 1800 |
Didn't even pay us for the deer carcass; what a scrooge. Unsure what to do with the cube, Bahat Ghul keeps it for now. The other robot eye, he plans to get installed during the next downtime. Kimimi keeps Chadley's wolf cloak and greataxe.
| Kills | XP |
| One-eyed bugs x15 | 1500 |
| Giant one-eyed bug | 600 |
| Chadley | 600 |
| Wolfpack kid | 100 |
| Total | 2800 |
Total of 4600 XP split 7 ways—657 XP per character (Marko sat this one out).
Ding! The thieves, Dhunprick Slipper and Dunarson Sundarsonson, son of Sunardonson are now level 2.
No downtime actions this time—the plan is to head to the Wind Temple right away.
Final remarks
I wanted to include some thoughts on the campaign so far, but while I was hemming and hawing about how to make these session reports more interesting, things got hectic at work, and now I'm six sessions behind. Therefore, instead of aiming for something lofty, I've decided to aim for something reasonable and reframe the motivation behind writing these: to share and preserve in text some of the fun times we've had so that they don't disappear forever into the ether of Discord voice chat. NBateman once said that one of his favorite pastimes is admiring his physique in the mirror. Hopefully, these play reports provide him with a different kind of mirror: a flattering reflection of the work he puts in as the Referee.
I think I will compile some of my thoughts on the campaign and tack them onto a shorter report later, maybe after we finish exploring the region. Perhaps it's even for the better—having the context of many sessions would allow me to refer to repeated patterns in the campaign's structure, which would allow for stronger conclusions. Or something. I don't actually have much to say; lol.
Anyway.
Stay tuned & follow along as I lower my standards even further, in the next episode of... Devil's World Heroes!